Wednesday, November 12, 2014
Friday, August 15, 2014
New Digital Content at Panstoria
This news just in........Check it out.
45 new kits! 2 new designers!
Panstoria welcomes Jen Martakis and Laura Burger to the panstoria.com store.
Including the first kits from Jen and Laura, we just released a total of 45 new kits.
Get your new content now at http://www.panstoria.com/store/category-page/category/digital_content.
Here is a copy of the finished book I did for my neighbor. The color was true and the binding great. I am well pleased with Panstoria quality and service. We also upgraded to the Lay Flat version that had thicker pages. We were able to customize the cover with a Glossy finish and put text on the spine.


Friday, June 20, 2014
From the attic to the coffee table
I am getting ready to do a BIG project for my neighbor. Her uncle made all these canvas oil paintings to go along with a poem he wrote that is 52 stanza's long. I am going to scan each painting and pair it with the line of poetry into Artisan and make a hard bound coffee table book for her whole family to enjoy! She found these long forgotten treasures up in her attic, but now they are moving out of state. They have always known about the poem and paintings but now it is time to digitize all this and get it into the hands of friends and family. I love working with Artisan and Historian.
Panstoria Historian 4 photo management and editing software

Historian and Artisan software
Here is the link for purchasing the Historian and Artisan Software from Panstoria.
Panstoria Historian 4 photo management and editing software
Panstoria Historian 4 photo management and editing software
I recently got in touch with my husbands cousin via Facebook. She still lives in NY, which is where we grew up. I used the Vintage Memories Kit from Panstoria to create the Shabby look for this old photo of my husband and his siblings. Artisan is so much fun to work with to make a quick update to an old photo.

Thursday, March 6, 2014
Panstoria Print Shop
I am very glad to be an affiliate with Panstoria Print Shop. Here is my link for new customers,
I love being able to print directly from Artisan/Storybook Creator and order directly from the Panstoria Print Shop without having to be online while creating my books and projects. I love being able to upload directly from the program and having Panstoria mail my projects back to me. When using my photos from Memory Manager/ Historian to make other gift projects, I love being able to have it all in one place, Panstoria. It was easy to make an account, using my email and a password. The print quality was great, the prices great and the quality of the Mug I just made was a crisp and clear print of my nephew. Who can resist a smile when you see this sweet little face wrapped around your very own mug filled with coffee or hot chocolate?
 If you don't have Artisan or Historian yet please email me at vstudtcmc@gmail.com and I will be happy to send you a link with my affiliate number attached. It changes every 90 days so I will post it here periodically.
Happy Scrapping!
and this link is for existing customers who already have an account at the Print Store,
I love being able to print directly from Artisan/Storybook Creator and order directly from the Panstoria Print Shop without having to be online while creating my books and projects. I love being able to upload directly from the program and having Panstoria mail my projects back to me. When using my photos from Memory Manager/ Historian to make other gift projects, I love being able to have it all in one place, Panstoria. It was easy to make an account, using my email and a password. The print quality was great, the prices great and the quality of the Mug I just made was a crisp and clear print of my nephew. Who can resist a smile when you see this sweet little face wrapped around your very own mug filled with coffee or hot chocolate?
Happy Scrapping!
Text Shapes
Let's continue with our Recipe Card Project! We can learn about Titles using our Text Shape option.
This is located under the Insert Tab, Text section, and the fourth selection called Shape. Click on that and you will be able to type your Title in easily with some fun design elements to play with. (Click on any photo below and it will open in a larger window for you to view, so you can see what I am talking about.)
 When you click Text Shape it will show up right on your screen for you to select and make it the way you like before you actually create it. You can change the text font, the color, the size and the outlines. You must click Create once you have it the way you like it. You will see all the Down Arrows Circled in RED for you to pay attention to those. You want to get really comfortable using those down arrows to change the look of your text shape. I would like you to click on every one so you can see what they do.
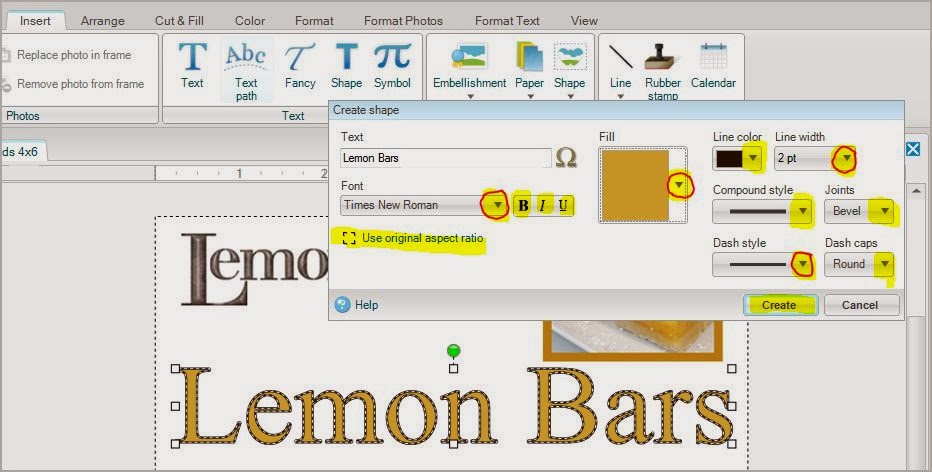 Let's take the next step to see what those arrows can do for you. You can change the color of your text shape and fill it with colors to match the page you are working on, or choose from the list of colors, or you can take a sample color, which I did from the Lemon Bars in the photo on the page. I wanted to color match. By clicking on the down arrow it opened another box where you will be able to choose your color options. Take a moment now to click on all the highlighted and circled areas to see what they will do.
 The wonderful thing about Text Shapes is the ability to outline so quickly and easily, with a Font that you choose. Depending on which Font you choose, it will make a big difference as to how much outline you can use. When you click on the down arrows showing the outline options you will get all different kinds of looks.

 You get to choose how wide the outline will be or you can choose no line. You get to see if you want dots, dashes, or solid lines, single, double or triple to outline your base font. Here are 3 different examples.
 As always, you can re-size this title down to what you need it to be and where you want it on the page. Another great benefit to Text Shape if you do not like it, once the item it selected, like it is shown above, you can just hit Delete, on your key pad, and it will be gone! The last thing you did on the Text Shape tool is still there. The font and color and size you were using are all there on the tool bar, ready for you to easily re-do, or change your mind, and make the necessary adjustments to suit your project. Now take a moment, and YOU, add a Text Shape to your sample page that you are working on!
This is located under the Insert Tab, Text section, and the fourth selection called Shape. Click on that and you will be able to type your Title in easily with some fun design elements to play with. (Click on any photo below and it will open in a larger window for you to view, so you can see what I am talking about.)
Wednesday, March 5, 2014
Creative Memories content availability extended till end of year. I am glad as I really like the CM content best of all. There are still a few kits I would like to get.
Panstoria has signed a deal with Creative Memories that allows Panstoria to continue selling CM digital content through Dec. 31, 2014. The deal applies to all CM content that is currently available in the Panstoria.com store.
You can find all of the CM content here:
http://www.panstoria.com/
Panstoria has signed a deal with Creative Memories that allows Panstoria to continue selling CM digital content through Dec. 31, 2014. The deal applies to all CM content that is currently available in the Panstoria.com store.
You can find all of the CM content here:
http://www.panstoria.com/
Title for Recipe Cards using ABC's
One easy project to start with is some Recipe Cards. The project covers a lot of design elements and lets you try many applications of styles. You can start your project by selecting custom project sizes. We just covered that topic in another blog post, if you need to go back and review. Create New Project. Go to Custom Sizes, and make your project size either 5x7 or 4x6. You can choose to select a blank page or a pre-designed page. I am going to choose blank and build my recipe card using the Recipe Kit and the Modern Kitchen Kit. Both are found on Panstoria's print shop. I am an affiliate on that page and would love it if you used my name. Thanks!
One elemental design is a Title. Let's start there. You can make your title using ABC's, or Text, or Text Shapes. Let's see how each one works. Go to your Insert Tab at the top and then to your Text section. Choose the middle selection of Text called Fancy. That is where your ABC's are located. Once you select that button it will open another box and you must choose which ABC's you want to use. Click on the drop down arrow and yet another box opens. Choose your ABC's. Be sure to click on the Sample ABC to select it. Now, in the lower right of the box click on Select Content. Your ABC's will change to the one you selected.


Now type your Title in the box provided and click Create. They are going to be oversized because everything is sized for a 12x12 scrapbook page. Your letters will be too big! Just take one of the white corners and resize them to fit onto your smaller custom page size. Corner to corner is the fastest way to resize. They are still grouped together.


ABC's are typed in and come onto your page grouped. These can be UNgrouped also for you to change them around and play with them. Remember there is Power in the Right Click. Once something is added to the page, you can select it, by clicking on it one time. Now that it is selected, by using your Right Click, you get to select what you want to do with it. Ungroup your letters and play! They are now individual letters.

 By keeping your eyes left, on the elements list you can select whatever letter you want to make bigger. By holding the Shift key down on your keyboard you can select more than one element at a time. By using your rulers, you click just once on the ruler bar to get yourself a line that will go across your page. Line up your ABC's so they are nice and straight. In the example, I have made the First letter of each word bigger and tucked the rest of the letters in to look nice. Now hold Shift key down and select all your letters, Right Click and Group. It will become one unit again. Just right click on your ruler tab if you want to delete the line.
 Once they are one unit again, they can be moved together anywhere on the page you need them to be.
 Now you select some for your project and play!
One elemental design is a Title. Let's start there. You can make your title using ABC's, or Text, or Text Shapes. Let's see how each one works. Go to your Insert Tab at the top and then to your Text section. Choose the middle selection of Text called Fancy. That is where your ABC's are located. Once you select that button it will open another box and you must choose which ABC's you want to use. Click on the drop down arrow and yet another box opens. Choose your ABC's. Be sure to click on the Sample ABC to select it. Now, in the lower right of the box click on Select Content. Your ABC's will change to the one you selected.
Now type your Title in the box provided and click Create. They are going to be oversized because everything is sized for a 12x12 scrapbook page. Your letters will be too big! Just take one of the white corners and resize them to fit onto your smaller custom page size. Corner to corner is the fastest way to resize. They are still grouped together.
ABC's are typed in and come onto your page grouped. These can be UNgrouped also for you to change them around and play with them. Remember there is Power in the Right Click. Once something is added to the page, you can select it, by clicking on it one time. Now that it is selected, by using your Right Click, you get to select what you want to do with it. Ungroup your letters and play! They are now individual letters.
Friday, February 21, 2014
Panstoria Store is still offering the Creative Memories digital content until the end of March, 2014. There are nearly 1,500 digital content products available now in the store. You can now view a PDF file of the content for easier viewing, of all the kits. If you purchase any CM content now, it will continue to be usable after the March date. Panstoria and Creative Memories will then come to the end of their agreement, March 31, 2014. Get that GREAT content while you can. I love the digital content from CM.
NOTE: When browsing the categories in the store for CM content, you will have to click on the lowest level category to see all the kits in that category. For example, if you want to see 12x12 Predesigned Pages, you will have to click that particular size (i.e. 12x12) beneath the Predesigned Pages category to see the available kits.
Artisan Photobooks contain a minimum of 21 pages and a maximum of 99 pages. To end a book on a single left-handed page, stop at an even number (maximum 98) and the printer will add a blank page at the end. If your book has an odd number of pages, it will end with a double page spred. The last, blank page will have the Panstoria Print Shop logo. Photobooks with the Lay Flat binding have a maximum of 59 pages.
If you try to print any Photobook with fewer than 21 pages, a standard Photobook with more than 99 pages, or a lay flat Photobook with more than 59 pages, the software will assume that you are ordering Page Prints. You will need to add or remove pages to within the allowable numbers to order it as a Photobook.
Duplicate Files of Content found in Content Manager
Did you know that you have a live link to access the content files right inside your Content Manager? This is very handy to know in case you have duplicates.
 Just click on the name of your content and it will open another dialogue box. That is where your files are stored, and if you have duplicates you can delete them.
 Just highlight the duplicate file by clicking to select. While it is blue, RIGHT CLICK, and delete. Simple.

Friday, January 31, 2014
Panstoria has a new announcement:
New Digital Content and Book Discount Today you get two announcements for the price of one!
New digital content - We have put a lot of new content into the Panstoria.com store in the last few weeks. To help you find that content, we have added a "New Content" category in the store. Everything that we have added since the first of the year (over 100 kits) can be found there. As we add new content in the future, it will appear in this category as well as in the category associated with the content designer.
New book discounts - The quantity discounts in the Panstoria Print Shop have been updated. Previously, the quantity discounts applied to only the base price of the book. Now the discount applies to the entire cost of the book, including the cost of extra pages and the lay-flat option. Purchase 10 or more books of a particular size in the same order and get 10% off. Purchase 100 or more and get 15% off.
In addition, the discount applies across multiple projects of the same product type in a single order. For example, if you purchase 5 copies of one 12x12 Hardbound book and 6 copies of another 12x12 Hardbound book in a single order, you will get 10% off the total cost of all 11 books.
Keep watching for more announcements. More exciting news is coming soon at Panstoria.
I also have access to more Creative Memories Digital Content: Here is a list of titles.
Total sports digital shapes, Tiny treasures digital shapes, Sporty content, Vintage chick, Candy Shop, PS I love you, The graduate, Shine, Love, Be Young boy, Be Young girl, Wedding fresh spring & radiant summer, Divine Wedding, Romantic autumn & Elegant winter, Nordic Christmas and Be Merry, Fabulous, Ashby Series, April afternoon, Simply beautiful, Reminisce, Vintage romance, Cheerful, Black-and-White, Rugged, Cottage Garden, Holidazzle & Noel, Enchanted, New Year's Celebration, Serene & Just fun, Click and fill 1,2,3,4,5,6,7,8, Click & Fill Holidays, Reflections, Reflections Seasons, Blush Blooms and Best buds.
Let me know if you are interested in any of these Content CD's and I will be happy to get those to you!
Thursday, January 2, 2014
Custom Projects
Are you starting out the New Year with some goals? I write things down and love to cross them off. I am a total list keeper!
This month let's learn how to make Custom Projects.
Did you know you can use Storybook Creator and/or Artisan to make more than just a 12x12 page? You can! Think Business Cards, Bookmarks, Calendar Pages, Post Cards, Recipes, Ads for marketing, and many more things you can print out on your own printer. Do you want to make mugs to give as gifts? They are usually sized for 11 oz and 15 oz. You can make Tee Shirts too. You can pre-design your projects.
Let's start with the Social Media site Facebook. Have you noticed that people have photos or pretty designs at the top of their own page? (If you do not have a photo, or banner, your page will look grey at the top.) Let me show you how to make a Facebook Banner.
Go thru these simple steps to make a custom size
project. We all create different projects so
these screen shots may not match exactly what you have on your screen. However, all the basic elements will be the
same.
#1
Open
Storybook Creator or Artisan
·
Your Welcome Page will appear

#2
Select
Create a Project

·
In
some programs a dialog box may appear, simply click continue.
#3
Select
New Project.

#4
Select
Custom Sizes. You
will see a blue circle with the #1 at the top of a new dialog box. Custom Sizes is the last option on the left.
·
Once you click on the Custom Sizes it
will turn blue and Column number Two will repopulate with different options.

#5
Select
New Custom Size. New Custom Size is the top one under
#2.
This list of options will repopulate.
·
Most likely, that is the only option on your list so far. But in time yours will look like my screen
shot when you get working on your projects. My screen shows a longer list of
options.

#6
Click
Next
in the lower right corner.
#7
Custom
Page Size dialog box opens up to put your new dimensions in
the Width and Height spaces. By now you
have several boxes open and your screen should look like this.

#8
Set
the Size and Parameters of your Custom Page
·
Facebook Banner Size is Width 11.35 x
Height 4.2

#9
Downsize
the file. Click on the 96 or 72 dpi.
·
This is done by clicking the down arrow
in the upper right of the box.
·
Click on Save

#10 Name your Project FB, or Facebook
Banner
·
Your new dialog box will auto populated with
the dimensions of the project.
·
You want to Rename it. Just type over the blue highlighted numbers.
·
This will now save it under your custom
sizes to use whenever you want. It is
sized exactly as you need it to post on the internet. You now have a template
to use or share with others.

We will do more Custom Projects this month. Thank you for checking in. Have fun creating.
Subscribe to:
Posts (Atom)