
Friday, June 20, 2014
From the attic to the coffee table
I am getting ready to do a BIG project for my neighbor. Her uncle made all these canvas oil paintings to go along with a poem he wrote that is 52 stanza's long. I am going to scan each painting and pair it with the line of poetry into Artisan and make a hard bound coffee table book for her whole family to enjoy! She found these long forgotten treasures up in her attic, but now they are moving out of state. They have always known about the poem and paintings but now it is time to digitize all this and get it into the hands of friends and family. I love working with Artisan and Historian.
Panstoria Historian 4 photo management and editing software

Historian and Artisan software
Here is the link for purchasing the Historian and Artisan Software from Panstoria.
Panstoria Historian 4 photo management and editing software
Panstoria Historian 4 photo management and editing software
I recently got in touch with my husbands cousin via Facebook. She still lives in NY, which is where we grew up. I used the Vintage Memories Kit from Panstoria to create the Shabby look for this old photo of my husband and his siblings. Artisan is so much fun to work with to make a quick update to an old photo.

Thursday, March 6, 2014
Panstoria Print Shop
I am very glad to be an affiliate with Panstoria Print Shop. Here is my link for new customers,
I love being able to print directly from Artisan/Storybook Creator and order directly from the Panstoria Print Shop without having to be online while creating my books and projects. I love being able to upload directly from the program and having Panstoria mail my projects back to me. When using my photos from Memory Manager/ Historian to make other gift projects, I love being able to have it all in one place, Panstoria. It was easy to make an account, using my email and a password. The print quality was great, the prices great and the quality of the Mug I just made was a crisp and clear print of my nephew. Who can resist a smile when you see this sweet little face wrapped around your very own mug filled with coffee or hot chocolate?
 If you don't have Artisan or Historian yet please email me at vstudtcmc@gmail.com and I will be happy to send you a link with my affiliate number attached. It changes every 90 days so I will post it here periodically.
Happy Scrapping!
and this link is for existing customers who already have an account at the Print Store,
I love being able to print directly from Artisan/Storybook Creator and order directly from the Panstoria Print Shop without having to be online while creating my books and projects. I love being able to upload directly from the program and having Panstoria mail my projects back to me. When using my photos from Memory Manager/ Historian to make other gift projects, I love being able to have it all in one place, Panstoria. It was easy to make an account, using my email and a password. The print quality was great, the prices great and the quality of the Mug I just made was a crisp and clear print of my nephew. Who can resist a smile when you see this sweet little face wrapped around your very own mug filled with coffee or hot chocolate?
Happy Scrapping!

Text Shapes
Let's continue with our Recipe Card Project! We can learn about Titles using our Text Shape option.
This is located under the Insert Tab, Text section, and the fourth selection called Shape. Click on that and you will be able to type your Title in easily with some fun design elements to play with. (Click on any photo below and it will open in a larger window for you to view, so you can see what I am talking about.)
 When you click Text Shape it will show up right on your screen for you to select and make it the way you like before you actually create it. You can change the text font, the color, the size and the outlines. You must click Create once you have it the way you like it. You will see all the Down Arrows Circled in RED for you to pay attention to those. You want to get really comfortable using those down arrows to change the look of your text shape. I would like you to click on every one so you can see what they do.
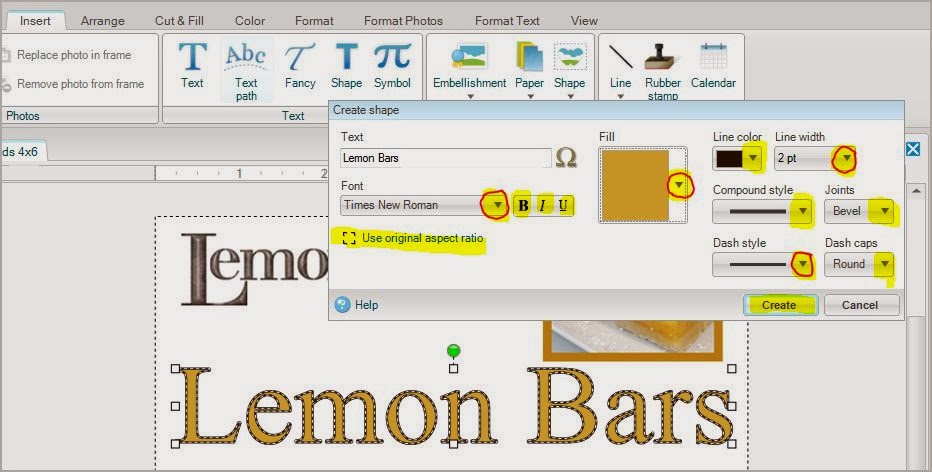 Let's take the next step to see what those arrows can do for you. You can change the color of your text shape and fill it with colors to match the page you are working on, or choose from the list of colors, or you can take a sample color, which I did from the Lemon Bars in the photo on the page. I wanted to color match. By clicking on the down arrow it opened another box where you will be able to choose your color options. Take a moment now to click on all the highlighted and circled areas to see what they will do.
 The wonderful thing about Text Shapes is the ability to outline so quickly and easily, with a Font that you choose. Depending on which Font you choose, it will make a big difference as to how much outline you can use. When you click on the down arrows showing the outline options you will get all different kinds of looks.

 You get to choose how wide the outline will be or you can choose no line. You get to see if you want dots, dashes, or solid lines, single, double or triple to outline your base font. Here are 3 different examples.
 As always, you can re-size this title down to what you need it to be and where you want it on the page. Another great benefit to Text Shape if you do not like it, once the item it selected, like it is shown above, you can just hit Delete, on your key pad, and it will be gone! The last thing you did on the Text Shape tool is still there. The font and color and size you were using are all there on the tool bar, ready for you to easily re-do, or change your mind, and make the necessary adjustments to suit your project. Now take a moment, and YOU, add a Text Shape to your sample page that you are working on!
This is located under the Insert Tab, Text section, and the fourth selection called Shape. Click on that and you will be able to type your Title in easily with some fun design elements to play with. (Click on any photo below and it will open in a larger window for you to view, so you can see what I am talking about.)
Wednesday, March 5, 2014
Creative Memories content availability extended till end of year. I am glad as I really like the CM content best of all. There are still a few kits I would like to get.
Panstoria has signed a deal with Creative Memories that allows Panstoria to continue selling CM digital content through Dec. 31, 2014. The deal applies to all CM content that is currently available in the Panstoria.com store.
You can find all of the CM content here:
http://www.panstoria.com/
Panstoria has signed a deal with Creative Memories that allows Panstoria to continue selling CM digital content through Dec. 31, 2014. The deal applies to all CM content that is currently available in the Panstoria.com store.
You can find all of the CM content here:
http://www.panstoria.com/
Title for Recipe Cards using ABC's
One easy project to start with is some Recipe Cards. The project covers a lot of design elements and lets you try many applications of styles. You can start your project by selecting custom project sizes. We just covered that topic in another blog post, if you need to go back and review. Create New Project. Go to Custom Sizes, and make your project size either 5x7 or 4x6. You can choose to select a blank page or a pre-designed page. I am going to choose blank and build my recipe card using the Recipe Kit and the Modern Kitchen Kit. Both are found on Panstoria's print shop. I am an affiliate on that page and would love it if you used my name. Thanks!
One elemental design is a Title. Let's start there. You can make your title using ABC's, or Text, or Text Shapes. Let's see how each one works. Go to your Insert Tab at the top and then to your Text section. Choose the middle selection of Text called Fancy. That is where your ABC's are located. Once you select that button it will open another box and you must choose which ABC's you want to use. Click on the drop down arrow and yet another box opens. Choose your ABC's. Be sure to click on the Sample ABC to select it. Now, in the lower right of the box click on Select Content. Your ABC's will change to the one you selected.


Now type your Title in the box provided and click Create. They are going to be oversized because everything is sized for a 12x12 scrapbook page. Your letters will be too big! Just take one of the white corners and resize them to fit onto your smaller custom page size. Corner to corner is the fastest way to resize. They are still grouped together.


ABC's are typed in and come onto your page grouped. These can be UNgrouped also for you to change them around and play with them. Remember there is Power in the Right Click. Once something is added to the page, you can select it, by clicking on it one time. Now that it is selected, by using your Right Click, you get to select what you want to do with it. Ungroup your letters and play! They are now individual letters.

 By keeping your eyes left, on the elements list you can select whatever letter you want to make bigger. By holding the Shift key down on your keyboard you can select more than one element at a time. By using your rulers, you click just once on the ruler bar to get yourself a line that will go across your page. Line up your ABC's so they are nice and straight. In the example, I have made the First letter of each word bigger and tucked the rest of the letters in to look nice. Now hold Shift key down and select all your letters, Right Click and Group. It will become one unit again. Just right click on your ruler tab if you want to delete the line.
 Once they are one unit again, they can be moved together anywhere on the page you need them to be.
 Now you select some for your project and play!
One elemental design is a Title. Let's start there. You can make your title using ABC's, or Text, or Text Shapes. Let's see how each one works. Go to your Insert Tab at the top and then to your Text section. Choose the middle selection of Text called Fancy. That is where your ABC's are located. Once you select that button it will open another box and you must choose which ABC's you want to use. Click on the drop down arrow and yet another box opens. Choose your ABC's. Be sure to click on the Sample ABC to select it. Now, in the lower right of the box click on Select Content. Your ABC's will change to the one you selected.


Now type your Title in the box provided and click Create. They are going to be oversized because everything is sized for a 12x12 scrapbook page. Your letters will be too big! Just take one of the white corners and resize them to fit onto your smaller custom page size. Corner to corner is the fastest way to resize. They are still grouped together.

ABC's are typed in and come onto your page grouped. These can be UNgrouped also for you to change them around and play with them. Remember there is Power in the Right Click. Once something is added to the page, you can select it, by clicking on it one time. Now that it is selected, by using your Right Click, you get to select what you want to do with it. Ungroup your letters and play! They are now individual letters.

Subscribe to:
Posts (Atom)